|
| Assembly and Painting of Figures By Larry Munne, Florida This article will briefly outline the various stages and steps that go into finishing and painting a Series 77 miniature. Series 77 kits are some of the finest casts and best-detailed kits on the market today, long a standard of the industry, Series 77 has produced more than 150 kits, depicting the warrior, soldier, and military man from 400 B.C. to 1956. The better a casting is, the better the finished miniature will be. Both for a beginner, or the “old pro” who totally converts his casting, the sharp detail and excellent anatomy of Series 77 makes them a natural choice for the discriminating collector. So, starting with opening the box, let's create a military miniature. |
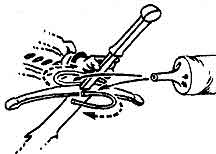
| CASTING CLEAN-UP First remove any and all visible seam lines with a fine jewelers file, a rat-tail, or a half round. A mouse-tail file is helpful, but not essential. Ninety per cent of all clean-up work can be done with these three files. Then you feel the seam have been completely removed, buff the entire figure gently with 0000 steel wool, paying particular attention to the areas that you have filed. This will eliminate the file marks, and will also show up any seam lines you may have missed. Let me re-emphasize, this must be done GENTLY so as not to dull surface detail or texturing. Next fit the parts together, and check for fit. At this stage you may also want to decide what to assemble and what should best wait until the figure has been painted. As a rule of thumb, I assemble all major components before painting, such as arm to body, haversacks, canteens, etc. Swords and muskets I usually paint separate, and attach them after the figure is painted. Remember, if you can see it, you can paint it. Before assembly, wash the kit parts to remove any grease, mld release compound, or any bits of steel wool that may be on it. ~-lash the kit with a mild dishwashing detergent and water. Now assemble the figure. I use a cyano-acrylate adhesive (like Hot Stuff or Super Glue 3) for most assembly. You may wish to lightly file the surfaces that you will be gluing as this provides ”tooth” for the adhesive to grab on to), and will give a good, clean bond. |
| FILING In virtually all metal kits, gaps will be obvious where parts have been joined, or possibly you will have a large area that requires filling due to conversion work. So whether the kit is being assembled perfectly stock, or you're converting a Zulu kit into a Grenadier Guard, a knowledge of fillers will be helpful. One of the most common fillers is Five-Minute Epoxy, which can be applied to joints and has a viscous consistency is helpful. Also, when dry it will aid in forming a bond. Epoxy shrinks as it dries, so be sure to apply enough to fill the gap. One drawback to epoxy is that, being transparent, it is hard to tell sometimes when you've got enough on. Although this epoxy dries within five minutes, it usually must set for at least two hours before you can file it. Another excellent filler is a product sold in most hardware stores, Duratite Surfacing Putty. This product dries fast (about fifteen minutes) and can be worked immediately. If allowed to dry for 24 hours, it becomes as hard as the metal beneath it. It feathers to a perfect edge, doesn't crumble, and is very economical. One word about this though, it begins to harden immediately! As soon as you apply it, it loses its working time. Don't try to smooth it, just apply it in globs and shape with a file later. Now, file the filled areas flush, then smooth with fine Flex-i-grit or steel wool. When this is done. wash the figure once more and mount on its base. You are now ready to prime and paint your figure. |
| PRIMER There are several excellent primers on the market today. I recommend Floquil Metal Primer (RR-9) as the best I have found. This is available in bottles, or in an aerosol can. During priming, it is important that all portions of the casting be covered. This protects the casting and seals the metal pores. |
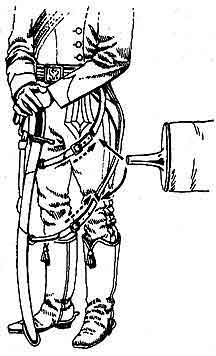
| BASES At this stage of work, before I actually paint the miniature, I usually decide exactly what kind of base, and what kind of ground work, if any, I'm going to use. It is an oft-repeated adage that a good base will make an indifferently painted figure look good, and a poor base will make an excellent figure look bad. This is very true, so plan your presentation with care. For standard Series 77 foot figures, I use a small block of wood, 2.5x2.5 inches, which has been finished and polished. I then drill two holes to accept the foot pegs of the figure. On top of this, I sculpt an appropriate ground work from Celluclay, and texture with pebbles, sawdust, etc. However, if you want the figure to rise above the base, glue the base that canes with the figure onto the wooden block, and build the groundwork up around this. Remember, spend some time and imagination on this part. The base and groundwork are the “frame” of your figure. Try to make the base reflect the character of your figure, and tell a bit about his situation. |
| PAINTING It would be impossible in the short space alloted to completely describe how to paint a miniature. Instead, I’d like to give you some general observations on the subject. First, the type of paint. Although I paint exclusively in artist's oils — I have used then for years and find then second to none for effect — a number of other paints are available, and give excellent results. The most common paint used in miniature painting is flat enamel, such as that manufactured by Humbrol, or Pactra. This paint is available in a very large range, is easy to work with, and dries very fast, completely matt, and gives a very pleasant finish. Another popular paint is Polly-S, a liquid water-based acrylic type paint, that also dries rapidly. This paint is a water-based paint so clean-up is very easy, with no unpleasant odor from thinners. Another water based paint that many modelers like is a casein based poster color called Pelikan Plaka. This paint dries dead matt, and is characterized by its brilliant hues. It makes a very striking miniature indeed. Someone not used to painting in water-based paints must realize that because these paints dry so rapidly, shading is best done by the subsequent applications of thin washes of a darker color. Once these paints dry, they are no longer water soluble. No matter what type of paint you select, certain guidelines will always apply. In all but the darkest colors, try to avoid the use of black in shading. If you are working with a green coat, shade it with a darker green. If you are working with a red coat, try a deep brown. The same rules apply to highlighting. Try to avoid the adding of white to lighten most colors. The exception to this rule is yellows and blues, which lighten best with white. White tends to “bleach” colors and make then look faded. Using our examples, highlight green with a lighter green, red with a deep orange. Rather, you're working on a very small scale, so colors will appear more intense. Try to avoid absolutes. Black boots look far more realistic if you add just a touch of white, so they are really a deep charcoal grey. White trousers, which give people a lot of problems, always should be painted slightly off-white. For “parade white” (ie, clean, just washed) I add a touch of black, so the actual color, is a very pale grey. This allows highlights to be done in pure white and be noticeable. For “field white” (ie, service uniforms or cloth-ing worn on campaign) I add a touch of yellow ochre or even brown. Let me emphasize, I mean a touch, just barely enough to discolor the white slightly. Too much and you've got someone wearing pale brown trousers instead of dirty white ones. Most people prefer their miniatures painted to a completely matt finish or a very slight sheen (eggshell) finish. However, it is sometimes necessary to duplicate the shine of polished leather or the sheen of finely polished wood. With oil paint this can be done by adding linseed oil. However, with most other paints, I’ve found this is best done with the use of glazes. I use Polly-S glazes most frequently. -These can be applied over any type of paint, and give very good results. I use both their clear gloss and their clear matt. This gives a satin effect. You can increase or decrease the shine by more or less gloss. For wood, I use straight gloss. For varying degrees of shine, adjust the mixture of the two. Don't try to just add water as this will only make the coverage spotty. How you finish your miniature depends largely on personal taste. By keeping the uniform as bright as you can, you portray an ideal, or by judicious use of earth colors, and muting the colors, you can depict a scene as realistic as a photograph. If you're going to depict ground, study the landscape outside your window. There are more grays and yellows in the ground than red-browns, and grass is far more of a yellow-green than most people think. Paint your figure as you would dress, skin first and hat last. Finally, be aware of the different textures of paints. For instance, you may prefer Humbrol for uniforms, but paint the flesh in oils to produce a more realistic contrast between flesh and cloth. Or conversely, a uniform done in oils may profit from having the belting done in Humbrols to emphasize the different textures between cloth of a uniform, and rough, thick canvas, or pipe-clayed leather. |
|
FINAL DISPLAY Now you have painted your miniature, and mounted him securely on a base, what then? First, be aware that the worst enemy of bright colors is sunlight. So don't set him on the eastern window sill. Running a close second to sunlight, and really far more of a problem, is dust. Dust picks up minute amounts of grease, from soil, from the air, etc., and this is what causes it to adhere to your miniature. Even when the dust is brushed away, this grease is left on the miniature, in effect, dulling the paint. The best way to avoid this is to keep your miniatures in a glass case, or put a dome around them. This not only enhances the appearance, but will repay you by keeping your miniature as bright as the day you finished it. Finally, a note on reference materials, and publications available. A number of magazines are published in this country and England. It is certainly well worth the effort of any serious collector to subscribe to these. They all carry frequent articles on painting, conversion tips, and examples of the work of sane of the finest painters in the world. Miniatures today are becoming less and less a hobby item and more and more of a recognized art form. Prestigious collections like the Forbes Magazine Collection have acquired miniatures for their collections, and galleries across the nation are beginning to exhibit the work of miniaturists. It doesn't matter how many identical castings are available, the one you paint, with the particular nuances and subtleties you add to it will be unique. The more meticulous your research into the uniform, the effort that goes into the painting, the time and care lavished on detail and presentation, will repay you for many years in enjoying that moment of tine, which you have captured forever, when Julius Dubitatus captured the Gaul, or Harry Bywater, dazed, wounded, but glad to be alive, leaned on his broken lance at Balaclava, and surveyed the ruins of his regiment, or Jean Guilbart, Col. of Carabineers, smiled at the excellent performance of his regiment before the emperor, it is all waiting for you, the past, today. |
      |
  |
  |